Thursday 23 July 2020

How to Transcribe YouTube Videos Automatically

A lot of us may not know, but YouTube comes with many useful features like translation for titles and description and YouTube keyboard shortcuts etc. Similarly, there are ways with which you can transcribe YouTube videos. As nowadays, the speech recognition software has improved a lot, you can get a reliable automatic transcription that can be easily edited to perfection with little to no effort.

It’s quite easy to transcribe YouTube videos as YouTube automatically transcribes most of the videos as soon as they are uploaded. In this post, I’ll show you three ways to get YouTube video transcriptions for free.
Method 1: Copy/Paste YouTube transcript

Most of the YouTube videos are automatically transcribed using Google’s Speech Recognition technology. There is also a chance that the owner of the video may have personally transcribed the video and made it available for the readers.

Whatever the case is, you can easily access the transcript and copy it along with timestamps.

Here’s how to do it:
Click on the More button below the video and select Transcript from the menu.


Below you’ll be asked to select a language. Make your choice and you’ll see a full transcript along with timestamps.
Now click and drag to highlight all the text and press Ctrl + C to copy the text. You can paste this text anywhere and your transcript will be ready.

YouTube automatically highlights words that it might have picked wrong which makes it easy to edit the transcript. Just click on the CC button in the YouTube player to enable subtitles and you will see the subtitles in white.

However, the subtitles with gray color are the ones that might have some mistakes. You can see this to easily amend the transcription. Although do keep in mind that subtitles uploaded by the video owner will not have gray words.

Method 2: Using third-party service

If you want more control and a better structure of the video transcript, then you need to get help from a third-party service.

There are many websites where you can paste the YouTube video URL to get a full transcript in return. I recommend DIYCaptions for this purpose as it’s easy to use and doesn’t come with annoying redirects or popups.

It basically has two types of transcript extractors. One to the transcript to text format, and the other to a transcript to .srt format along with timestamps. Just paste the video URL in the text field of your required extractor and click on Go.


You will see the transcript on the next page that you can copy/paste into your favorite editor.

In case you want to edit the transcript or directly download it in your preferred format, then DIYCaptions also offers a Transcription Pad. You can find the Transcription Pad on the DIYCaptions home page. Simply enter your YouTube video’s URL there and click on Go.


On the next page, you can control the playback of the video and watch it side-by-side to the text editor. There are also buttons to view or download transcripts of the video.

Method 3: Transcribe with Google Doc

The above two methods work fine when an automatic or owner-uploaded transcript of the YouTube video is available. However, if you want to transcribe a video without an available transcript, then you can use the Google Docs’ built-in voice typing feature to listen to the video audio and automatically type everything.

In order to have a good quality transcript, it is recommended to make the PC directly listen to the audio coming out of its speakers.

Here is how to do it:
In Windows, right-click on the sound icon in the taskbar and select Recording devices.

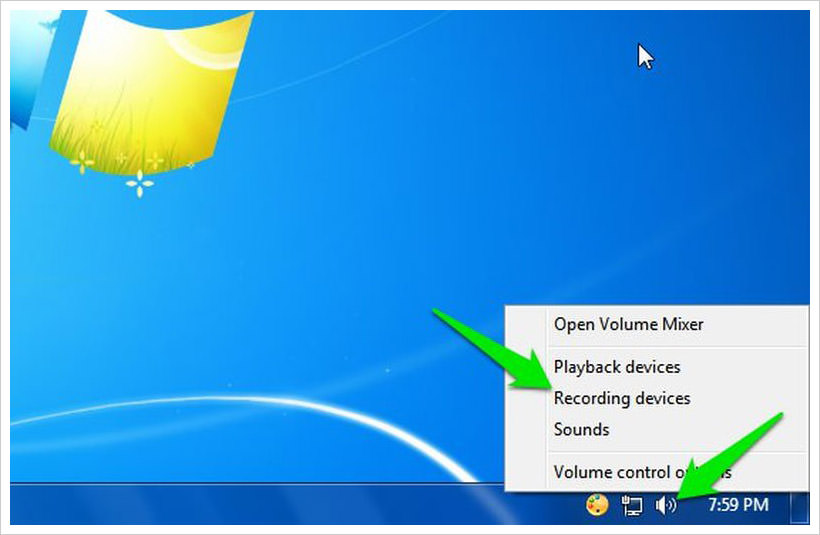
Now select "Stereo Mix" from the list and click "Set Default" to set it as default source of recording.

In case Stereo Mix option isn’t supported by your PC’s sound card (like mine), then you can download and install the VB Virtual Audio Cable tool and get an alternative option in the same menu.

After installing the drivers of the tool, you should see a "Cable Output" option in the same sound options. Select this option and then click " Set Default".

After this, your PC will listen to the audio coming out of the speakers for recording purposes. Now you just need to start Google Docs Voice typing and the required video simultaneously to start the transcription.

Here’s how to do it:
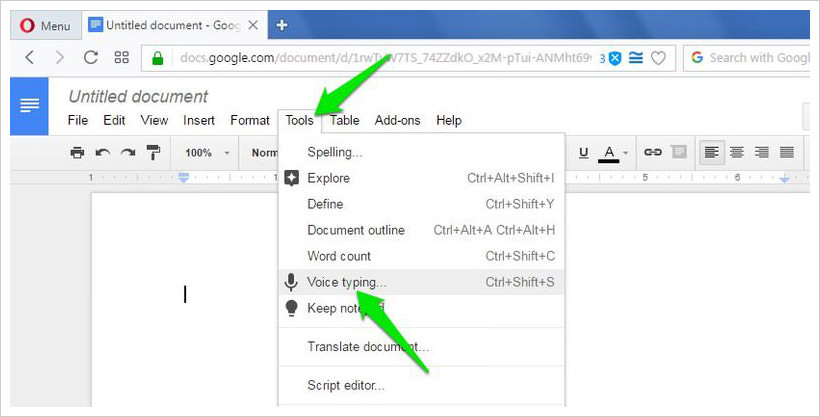
Open Google Docs in Chrome or any other Chromium based browsers (Voice Typing isn’t supported in non-Chromium browsers).
Now create a new document and select"Voice typing" from the Tools menu on top.

A tiny box will show up with a microphone icon in the middle. Click on it to start recording.
Move to the YouTube video tab and play the video. Google Docs will automatically type when people will speak in the YouTube video.

Of course, this process will take as much time as the duration of the video, but at the end you’ll have a good transcript of the video. Google Docs Voice typing also has support for over 40 languages, you can click on the Voice typing box menu to change the language.

The resulted transcript should be as good as YouTube’s own automatic captioning service as both use the same Speech Recognition technology.
Conclusion and suggestions

I like watching YouTube videos with captions turned on, and I can confirm that YouTube automatic captions is really good and makes very little mistakes. Even videos with minor background noise are transcript-ed with great accuracy.

Of course, if you don’t want to make edits in your transcription or correct punctuation, then you can always pay a professional to do it for you. On a website like Fiverr, you can get an hour worth of video transcript-ed for just $20.

Sunday 19 July 2020

How to optimize Virtual Memory

With a low RAM, it’s difficult to multitask smoothly on Windows 10. The recommended solution is to either clean the RAM or upgrade it. However, if you’re not willing to spend money on it, then the other option is to allocate more virtual memory.

Virtual memory is a software-level optimization for improving responsiveness of any system. The operating system uses virtual memory whenever it’s short of actual memory (RAM). Though Windows 10 manages this setting, yet configuring it manually gives much better results.

Perform these steps to optimize the virtual memory:

  • Right-Click Start, select Control Panel and then choose the option System and Security
  • Click System in the window that appears, then choose Advanced system settings option from the left pane
  • In the new window, click the Advanced tab and then click the Settings button under Performance
  • Select the Advanced tab in the new window and click on the Change button under Virtual Memory
  • In the new window that appears, uncheck Automatically manage paging file size for all drives
  • Select the C: drive and then click the radio button for Custom size
  • Now set the Initial size (MB) to the size of your RAM and Maximum size (MB) to double the size of your RAM (for ex., if the size of the RAM is 4GB, set the initial size to 4000 MB and maximum size to 8000 MB)
  • Click the Set button and then OK (and restart when asked for)


How to Disable Startup Programs in Windows

Your PC may be running slow because of a huge list of startup programs (apps that start along with the system). These apps slowdown the boot up process and degrade the device’s performance, hence disabling such apps speeds up the performance of the system and improves the overall responsiveness.

However, for a short-cut to locate and disable the startup programs , do the following:

Press Ctrl + Shift + Esc to open Task Manager
Click the Startup tab to check the list of startup programs
Right-click and select Disable on programs you only occasionally or ever rarely use.


How ever this will increase your system performance immediately.

Saturday 18 July 2020

How to Uninstall a Windows 10 Update


Windows updates often bring bug fixes, security patches, and new features to your PC, but they can also backfire—introducing problems like performance degradation or even panic-inducing data loss. If you’re noticing some quirkiness after installing an update, you can roll it back to try and get things working again.

There are two main kinds of Windows updates: Quality Updates and Feature Updates. Quality updates include security patches, bug fixes, and other small tweaks inside those regular "Cumulative Updates" you’ll see on the Windows Update page in Settings. Feature Updates are larger, and come every six months or so packed with new features and major changes. Each of these can be rolled back through different methods.
How to Uninstall Quality Updates

If a smaller Windows update has caused some odd behavior or broken one of your peripherals, uninstalling it should be pretty easy. Even if the computer is booting fine, I generally recommend booting into Safe Mode before uninstalling an update, just to be on the safe side. 

Open the Start menu, click the Power button, then hold Shift as you press Restart—that should present you with Windows’ recovery menu when your computer reboots. (If Windows won’t start up at all, you can hold the power button as your computer’s booting to invoke the recovery menu the next time you turn it on.) 

In the recovery menu, head to Troubleshoot > Advanced Options > Startup Settings > Restart. Once your computer restarts, you’ll be presented with a list of options, and you can press the number 3 on your keyboard to enter Safe Mode.


Once you’re in Safe Mode, head to Settings > Update & Security > View Update History and click the Uninstall Updates link along the top. Windows will present you with a list of recently installed updates, complete with links to more detailed descriptions of each patch alongside the date you installed it.

If you can remember when your problems started happening, that install date should help you determine which update to remove. Select the update in question, then click the Uninstall button that appears above the list. It’ll take a moment, but once it’s finished, you can see if your problems persist.

Note that once you uninstall an update, it will try to install itself again the next time you check for updates, so I recommend pausing your updates until your problem is fixed.

If that Uninstall button doesn’t show up on this screen, that particular patch might be permanent, meaning Windows doesn’t want you to uninstall it. I’ve heard tales of unsupported trickery that gets around this, but I haven’t tested myself. Instead, Microsoft recommends using System Restore or a system backup to roll your computer back to a previous state. (You do have a backup, right?)

How to Uninstall a Windows 10 Feature Update

Smaller quality updates come to your PC on a pretty regular basis, but Windows 10 Feature Updates are different. Twice a year or so, Windows will prompt you to download one of these major versions, like the May 2020 Update. Microsoft tries to avoid issues by testing these updates on many different hardware configurations, and only rolling it out after your setup is deemed suitable. Still, problems happen, so Windows offers a rollback option.

There’s one catch: you can only uninstall a major update within 10 days after installing it, so act fast if you think the update may have barked your system. After 10 days, Microsoft removes the old files to free up space on your hard drive, and you can no longer roll back.

To uninstall a Feature Update, head to Settings > Update & Security > Recovery, and scroll down to Go Back to the Previous Version of Windows 10. Click the Get Started button to start the un-installation process. If the button isn't clickable, it's possible your 10 days are already up, or you removed the old files with Disk Cleanup and it can no longer roll back. If you have a system backup, now would be the time to use it.


If Your Computer Won't Boot Into Windows at All

If, after installing an update, you can’t even boot into Windows to follow the above instructions—even through Safe Mode—Windows should automatically attempt to roll itself back. If that fails, however, you have one final option (before restoring from that backup you definitely have).


Hold the power button as your computer’s booting to turn it off, then turn it back on. This should bring you to Windows’ recovery options, just like when you boot into Safe Mode. Only this time, head to Troubleshoot > Advanced Options and choose Uninstall Updates. This will present you with the option of uninstalling the latest Quality Update or the latest Feature Update, which will hopefully allow you to boot back into Windows safely again. 

It doesn’t present you with a list of recent updates the way Windows’ Control Panel does, so we still recommend trying the steps in the above sections if you can. However, if all else fails, this recovery option is a last-ditch effort.

Automatically Sign into Windows 10


With Windows 10 you can log into your PC faster by using a simple four-digit PIN. This feature was originally introduced in Windows 8 and it is still remains in the Windows 10. If you are the sole owner of your PC (meaning not shared with anyone) and you find that a PIN isn’t fast enough, you can set it to automatically sign in, too.

Important: For obvious security reasons, you don’t use this feature if you’re using a shared computer with multiple accounts in your household. Also, you don’t have this set up when using your Windows 10 laptop in a public location. But if you are alone and in a secure location, this does let you get going faster.

Automatically Sign into Windows 10

Method 1: Automatically logon in Windows 10 without password

Step 1. You right-click the Start button and select Run from the hidden quick access menu, or you can use the keyboard shortcut Windows Key+R to bring up the Run dialog.


Step 2. Now you type: netplwiz and hit Enter or click OK.


Step 3. Then you select your user account first and then you uncheck the option labeled Users must enter a user name and password to use this computer. You click Apply button to see Automatically sign in box.


Step 4. In the dialog, you type your password and then re-enter the password to confirm the same.


That’s it! After you restart your system, you will still see the sign in screen, but won’t need to enter anything. This process bypasses the Lock Screen, too.

It’s also worth mentioning that you will still be able to lock your PC when you walk away from it by hitting Windows Key+L. If you want to get back into it, you will need to sign in with your password.

Again, you don’t have this enabled if you’re out and about with your Windows 10 computer in a public location or while traveling. You don’t want someone to have free access to all of your data.

Method 2: You use Registry Editor to turn on automatic logon

To use Registry Editor to turn on automatic logon, you follow these steps:

You click Start, and then click Run.

In the Open box, you type Regedt32.exe, and then press Enter.
Locate the following subkey in the registry:
HKEY_LOCAL_MACHINE\SOFTWARE\Microsoft\Windows NT\CurrentVersion\Winlogon
You double-click the DefaultUserName entry, type your user name, and then click OK.
You double-click the DefaultPassword entry, type your password, and then click OK.Note If the DefaultPassword value doesn’t exist, it must be added. To add the value, you follow these steps:
On the Edit menu, you click New, and then point to String Value.
You type DefaultPassword, and then press Enter.
You double-click DefaultPassword.
In the Edit String dialog, you type your password and then click OK.

Note If no DefaultPassword string is specified, Windows automatically changes the value of the AutoAdminLogon key from 1 (true) to 0 (false), disabling the AutoAdminLogon feature.
On the Edit menu, you click New, and then point to String Value.
You type AutoAdminLogon, and then press Enter.
You double-click AutoAdminLogon.
In the Edit String dialog box, you type 1 and then click OK.
You should add the DefaultDomain value if you have joined the computer to a domain, and the data for the value should be set as the fully qualified domain name (FQDN) of the domain.
You exit Registry Editor.
You click Start, click Shutdown, and then type a reason in the Comment text box.
You click OK to turn off your computer.
You restart your computer. You can now log on automatically.

Notes:

  • To bypass the AutoAdminLogon process and to log on as a different user, you press and hold the Shift key after you log off or after Windows restarts.
  • This registry change doesn’t work if the Logon Banner value is defined on the server either by a Group Policy object (GPO) or by a local policy. When the policy is changed so that it does not affect the computer, the autologon feature works as expected.
  • When EAS (Exchange Active Sync) password restrictions are active, the autologon feature does not work. This behavior is by design. This behavior is caused by a change in Windows 8.1 and doesn’t affect Windows 8 or earlier versions. To work around this behavior in Windows 8.1 and later versions, you remove the EAS policies in Control Panel.
  • An interactive console logon that has a different user on the server changes the DefaultUserName registry entry as the last logged-on user indicator. AutoAdminLogon relies on the DefaultUserName entry to match the user and password. Therefore, it may fail. You can configure a shutdown script to set the correct DefaultUserName.
  • You also can use the Sysinternals tool AutoLogon to enable this functionality easier. It also helps you to use an encrypted version of password.

All the Windows keyboard shortcuts


All Key Board Short Cuts


  • Ctrl + X Cut the selected item.
  • Ctrl + C (or Ctrl + Insert) Copy the selected item.
  • Ctrl + V (or Shift + Insert) Paste the selected item.
  • Ctrl + Z Undo an action.
  • Alt + Tab Switch between open apps.
  • Alt + F4 Close the active item, or exit the active app.
  • Windows logo key + L Lock your PC.
  • Windows logo key + D Display and hide the desktop.
  • F2 Rename the selected item.
  • F3 Search for a file or folder in File Explorer.
  • F4 Display the address bar list in File Explorer.
  • F5 Refresh the active window.
  • F6 Cycle through screen elements in a window or on the desktop.
  • F10 Activate the Menu bar in the active app.
  • Alt + F8 Show your password on the sign-in screen.
  • Alt + Esc Cycle through items in the order in which they were opened.
  • Alt + underlined letter Perform the command for that letter.
  • Alt + Enter Display properties for the selected item.
  • Alt + Spacebar Open the shortcut menu for the active window.
  • Alt + Left arrow Go back.
  • Alt + Right arrow Go forward.
  • Alt + Page Up Move up one screen.
  • Alt + Page Down Move down one screen.
  • Ctrl + F4 Close the active document (in apps that are full-screen and let you have multiple documents open at the same time).
  • Ctrl + A Select all items in a document or window.
  • Ctrl + D (or Delete) Delete the selected item and move it to the Recycle Bin.
  • Ctrl + R (or F5) Refresh the active window.
  • Ctrl + Y Redo an action.
  • Ctrl + Right arrow Move the cursor to the beginning of the next word.
  • Ctrl + Left arrow Move the cursor to the beginning of the previous word.
  • Ctrl + Down arrow Move the cursor to the beginning of the next paragraph.
  • Ctrl + Up arrow Move the cursor to the beginning of the previous paragraph.
  • Ctrl + Alt + Tab Use the arrow keys to switch between all open apps.
  • Alt + Shift + arrow keys When a group or tile is in focus on the Start menu, move it in the direction specified.
  • Ctrl + Shift + arrow keys When a tile is in focus on the Start menu, move it into another tile to create a folder.
  • Ctrl + arrow keys Resize the Start menu when it’s open.
  • Ctrl + arrow key (to move to an item) + Spacebar Select multiple individual items in a window or on the desktop.
  • Ctrl + Shift with an arrow key Select a block of text.
  • Ctrl + Esc Open Start.
  • Ctrl + Shift + Esc Open Task Manager.
  • Ctrl + Shift Switch the keyboard layout when multiple keyboard layouts are available.
  • Ctrl + Spacebar Turn the Chinese input method editor (IME) on or off.
  • Shift + F10 Display the shortcut menu for the selected item.
  • Shift with any arrow key Select more than one item in a window or on the desktop, or select text in a document.
  • Shift + Delete Delete the selected item without moving it to the Recycle Bin first.
  • Right arrow Open the next menu to the right, or open a sub menu.
  • Left arrow Open the next menu to the left, or close a sub menu.
  • Esc Stop or leave the current task.
  • PrtScn Take a screenshot of your whole screen and copy it to the clipboard.


Note:
You can change this shortcut so it also opens screen snipping, which lets you edit your screenshot. Select Start > Settings > Ease of Access > Keyboard, and turn on the toggle under Print Screen shortcut.

Friday 17 July 2020

Discover a hidden hard drive partition


Hard drives play an important role in our computers. They provide you with a safe, efficient, and effective way to store your important electronic data.

However, at times, these drives can fail leaving you with corrupt data or vanishing partitions. If this does happen to you, there are many free data recovery programs to help assist you in saving your data.

At certain times, one or more partitions may not appear when you click on Start > Computer, but they will appear in Disk Management. This situation arises when Windows is either reinstalled or an external drive is disconnected incorrectly. To recover missing partitions or complete drives, we recommend a freeware program called TestDisk.

Running in a Windows, Macintosh, or Linux environment, TestDisk can attempt to recover your missing partition. Please note that hard drives can fail and certain files may be corrupt, thereby making the data unrecoverable.


By following the guide below for a Intel optimized Windows PC, there is a strong chance that TestDisk can recover your missing partition.


1. To begin, download TestDisk to your preferred download location.

2. Next, extract the downloaded zipped file.

3. Open up the extracted file and right click on the testdisk_win.exe and click Run as Administrator. If your User Account Control Window appears, click Yes.

4. You will now be greeted with the TestDisk interface; to navigate around, use your keyboard’s arrow keys.

5. In the first menu, move the selector to No Log, and press the Enter key.

6. TestDisk should now display all of your connected drives, including any hidden hard drives. Select your hidden hard drive and then select Proceed. Press Enter to select.

7. In the next menu, select your partition type which should be Intel/PC partition. Then press Enter.

8. Now, tell TestDisk to Analyze the drive. This will search for any hidden partitions. Hit Enter to select.

9. After analyzing the hard drive, TestDisk will display all of the partitions on the drive. Select Quick Search and press Enter.

10. Once the search has finished, tell TestDisk whether or not the partition was created by Windows Vista/7. If Yes/Not Sure select Y, otherwise select N.

11. Here TestDisk will indicate if the partition of your lost drive is bootable. If the Structure shows as OK then press Enter.

12. Next, select Write to write the partition structure to disk. Hit Enter to select Write.

13. Confirm write to the partition table by typing Y and hitting Enter.

14. Once the writing has completed, TestDisk will ask you to reboot.

15. Close TestDisk and reboot your system.

16. Once the system reboots your hard drive partition should become available to Windows for it to be read.

During the process of running TestDisk, you may find that scans can take a long time. Allow the process to complete and do not close TestDisk.


When exploring TestDisk or by viewing the screenshots above, you will notice that TestDisk can perform many more tasks as well. TestDisk has the ability to backup data from a failed drive, fix a corrupted MBR, and many more. Be sure to understand each function before following through with the process.


Please note that TestDisk is not perfect. It is a free program that does not come with a warranty. You will be running TestDisk at your own risk. If you run into trouble or would like assistance, please create a new thread in the hard drive section of the forum.

Monday 13 July 2020

How to solve Google Chrome crashing issues


Try these fixes to solve Chrome keeps crashing

1.Close other tabs and extensions
2.Switch to a new profile
3.Check the incompatible applications and programs
4.Run a virus scan
5.Run System File Checker

Note: the screenshots below come from Windows 10, and the fixes also work on Windows 8 and Windows 7.

Fix 1: Disable other tabs and extensions


Step 1: Close other tabs


You may have noticed that your Chrome gets slow down to a crawl when lots of tabs opening in the browser. So if you’ve opened many tabs in your Chrome, your Chrome may run out of memory, and it crashes your browser without doubt.

1) Close all the tabs in your Chrome.

2) Close your browser and restart your Chrome.

3) Open the tabs and launch the web page again to see if it works.

Step 2: Disable extensions

It’s very common that the add-ons or extensions installed in your Google Chrome can cause your browser crashing. If your extensions get updated, the new update is not compatible with your browser, and that’s why your Chrome keeps crashing. So you should temporarily disable the add-ons and extensions in your Chrome to fix the crashing issues.

1) Copy and paste “chrome://extensions” into the URL bar on your Chrome.


2) You’ll be presented with the extensions you have in your browser.

3) Click the slider to toggle all the extensions to OFF.
Note: if you’ve installed Flash extensions in Google Chrome, you should disable it as the Flash extensions can cause the crashing for your browser.


4) Restart Google Chrome and see if it crashed.
Fix 2: Switch to a new profile

You can also try switching to a new user profile to fix the crashing issues in Google Chrome. Here’s how to do it:

1) Go to Google Chrome Settings.

2) Click Manage other people under the People section.


3) Click Add Person.


4) Give a name to the new user profile, and click Add.


5) Restart your Chrome and use Chrome with the new user profile.

Fix 3: Check the incompatible applications and programs

If you’ve installed a new application recently, or updated the programs in your computer, you should check whether there is any incompatible application or program that bring you the crashing issues.

1) Copy and paste “chrome://conflicts” in Google Chrome address bar and you’ll see the software to load.

2) Click Chrome Settings.

3) Click Advanced.


4) Click Update or remove incompatible applications under the Reset and clean up section.


5) If you see any application that could prevent Chrome from working properly, click Remove next to that application.

6) Restart Google Chrome and see if it still crashes.

Fix 4: Run a virus scan
There can be malware or virus in your computer, which leads to your Google Chrome keeps crashing.

So run a virus scan across your entire Windows system. Yes, it will take some time to complete, but it’s worth it. Unfortunately, Windows Defender may not detect it, so it’s worth trying another antivirus application such as Avira and Panda.

If any malware has been detected, follow the instructions provided by the antivirus program to fix it.

Then restart your computer and see if it fixes the Chrome crashing issue.

Fix 5: Run System File Checker

The System File Checker (SFC) is a Windows tool that scans for corrupted system files and repairs them. Here’s how to use it.

1) Type cmd in the taskbar search box. Right-click Command Prompt (or cmd if you’re using Windows 7) to select Run as administrator, and then click Yes to confirm.


2) Once you see the command prompt, type sfc /scannow and press Enter on your keyboard.


3) Windows will now verify the system files, and automatically fix any issues.

4) Once verification is complete, exit the Command Prompt and try to launch the program that was giving you the error.

Still no luck? Okay, there’s one more thing we can try…

That’s it. Hope this post helps in resolving your Google Chrome crashing issues. If you have any questions, feel free to leave a comment below and we’ll see what more we can do

Saturday 11 July 2020

How to fix Thumbnail Cache Auto Deletion Problem

This problem occurs mainly in Windows 7, Windows 8 and later versions.


Problem Symptom:

Suppose you have a folder containing lots of images and video files. You change the folder view type to show thumbnails of images and videos such as large icons, extra large icons, etc. Now Windows Explorer will start creating thumbnails of all images and video files. It'll take a few seconds for Windows to create thumbnails for each file. Windows automatically creates a thumbnail cache file to store all thumbnails so that it can directly show thumbnails for the same images or video files without any delay when you open the same folder again in future.
The problem occurs when you restart your system and try to open the same folder again. Windows automatically deletes the thumbnail cache upon reboot and recreates the thumbnails again for all images and video files.

When this happens again and again, it becomes quite annoying to wait for all thumbnails creation each time you open the same folder.
It might also happen with thumbnails of music files, PDF files or other file types which support thumbnail view.
It might happen without restarting the system as well. Sometimes Windows automatically deletes and rebuilds the thumbnails each time you open the same folder.

Problem Reasons:

There might be many reasons behind this annoying problem:
Corrupt thumbnail cache folder
Windows automatic maintenance service

Disk Cleanup utility

3rd party data cleaning software such as CCleaner
The "C:\Users\Username\AppData\Local\Microsoft\Windows\Explorer" folder is the main folder which stores all thumbnail cache files. Sometimes the folder or the thumbnail cache files might become corrupted which may cause this problem.
Windows 8 and later operating systems come with a new Automatic maintenance service which regularly deletes unnecessary files and performs system optimization tasks. This service might also delete thumbnail cache files.
Windows built-in utility "Disk Cleanup" also comes with an option to remove thumbnail cache files. It might also be possible that you are running Disk Cleanup utility regularly which is clearing thumbnail cache files.
Also many 3rd party temporary file cleaning software such as CCleaner allow you to clean thumbnail cache files. So it may also be possible that you are regularly deleting thumbnail cache files using such tools.

Problem Solutions:

If you are facing this problem in Windows, you can try following solutions. We are sure that these solutions will help you in fixing this annoying problem:

METHOD 1: Reset Corrupt Thumbnail Cache Folder
First of all try to reset thumbnail cache folder so that it starts storing thumbnail cache files from scratch.
1. Press Win+R keys together to launch RUN dialog box, then type following string in RUN box and press Enter:
C:\Users\Username\AppData\Local\Microsoft\Windows\Explorer
Replace Username with your correct Windows user account name.
If the above trick doesn't work for you. Type appdata in RUN dialog box and press Enter. It'll open AppData folder. Now go to "Local\Microsoft\Windows\Explorer" folder.
2. Once you open Explorer folder, select all files/folders present inside it and delete them
.

Some files might remain in the folder. Leave them and restart your computer. Now Windows should create thumbnail cache without any problem and it'll not delete them again.

METHOD 2: Disable Automatic Maintenance Service

If the above mentioned method doesn't work for you, try following:
1. Press Win+R keys together to launch RUN dialog box, then type taskschd.msc in RUN box and press Enter.
2. It'll open Task Scheduler program. Now go to:
Task Scheduler Library -> Microsoft -> Windows -> TaskScheduler
3. In right-side pane, you'll see following 4 tasks:
Idle Maintenance
Maintenance Configurator
Manual Maintenance
Regular Maintenance

4. You need to disable following 3 tasks:
Idle Maintenance
Manual Maintenance
Regular Maintenance
To disable them, right-click on the task and select Disable option.
5. Sometimes "Maintenance Configurator" task may re-enable the other 3 tasks. In such case, you'll need to delete all 4 tasks. Click on each task and press Delete key.
But Windows will not allow many users to delete these tasks right from Task Scheduler program. If you also face this problem while deleting those tasks, do as following:
5. a. Type tasks in RUN dialog box and press Enter. It'll show permissions related message, click on Continue button. It'll open C:\Windows\System32\Tasks folder which stores all tasks listed in Task Scheduler program.
5. b. Now go to Microsoft\Windows\TaskScheduler folder and delete all 4 tasks files. If you face any permission related issue, take ownership of the files as mentioned in this guide and then delete the task files.
6. That's it. Now you have disabled Windows automatic maintenance service and it should fix the automatic thumbnail cache deletion problem.
METHOD 3: Prevent Disk Cleanup Utility from Deleting Thumbnail Cache
If you use Disk Cleanup Utility in future, make sure you uncheck "Thumbnails" option given in the list. It'll prevent Windows from deleting thumbnail cache files.


METHOD 4: Prevent 3rd Party Software from Deleting Thumbnail Cache
If you use CCleaner or other temp file cleaning utilities, make sure to uncheck options to delete thumbnail cache files.

Download CCleaner Here


That's it. If you know about any other working solution, feel free to share it with us...

Fix Android Apps Auto Closing Problems


Every phone is built to stand a certain level of usage. Some power users end up burdening the CPU by installing apps that do not ideally qualify for the phone. This creates instability in the app causing it to crash.

These are some of the most common reasons that cause apps to crash automatically. Most of the times, the cause of the problem will make it easier for you to identify the right solution.

Procedure 1:Update the App

Apps must always run their updated version so that any known bugs or errors can be fixed in it. Developers regularly roll out updated to solve user issues with the app. There is a chance that the app begins to crash because it is running an old version that lacks the performance capabilities of its updated version.

Go to the Play Store
Tap on the menu icon (three horizontal bars) on the left of the search bar
Tap on My apps and games

From the list of installed apps and games, look for the app causing trouble and check if the update button is highlighted next to it.
Tap on Update if the button is highlighted and the latest version of the app will be installed on your device.


Once the app is updated, check if the problem has been solved.


Procedure 2: Make Space on Your Device


Many apps need adequate space for creating new files or storing data created when you use the apps. When your phone or tablet begins to run low on storage space, it gets difficult for the app to create data. Many devices feature lots of storage, but if you have too many apps and data files taking up space then your app may crash. An easy way to solve this problem is to check for apps that you haven’t used for a long time and uninstall them. You can also use Android apps for cleaning up old and unwanted files from the device.


Procedure 3: Clear App Cache and App Data


If an app crashes frequently then you may be able to fix the problem by clearing the app cache and data. The app cache files include data which speeds up the app performance. Deleting the cache files will not cause any loss of important data. The file will be automatically created when you open the app the next time, albeit you may notice a slight delay in opening the app after deleting the cache files. This is because the cache files are being created.


The app data files, on the other hand, include important data like passwords and other information that personalizes the app for you. By clearing the data file you will lose the configuration of the app and it will have to be reconfigured.
Go to the Settings menu of your device
Tap on Apps
Look for the app causing the problem and tap on it
Tap on Clear Cache
Next, tap on Clear Data and Tap on OK when you see a warning that tells you that data related to the app configuration will be lost.


Once the cache and data files have been cleared, you will get the chance to start all over again with the app. Check if this fixes the problem.
Solution 4: Uninstall Apps That You Don’t Use

A lot of times, we end up housing apps that we don’t use at all in our app drawer. In addition to taking up precious storage space, if any of these apps develop a bug, then you will begin facing all sorts of problems, and sometimes it may even extend to other apps which may share the same permissions. Avoid such problems by cleaning up your device and removing those apps that you do not use.
Tap on the Settings icon from the notifications shade
Look for Apps and tap on it
Check the apps that you do not require
Tap on them and you will either have the option to uninstall or disable them.


Once you uninstall the apps you do not use, restart your device and check if the problem of the app closing on its own is fixed.

How to enable right Click on any website


You might remember an experience where you tried to right-click on a web page but got a pop-up message saying that the “right-click functionality has been disabled”. Sometimes you may be trying to copy an image or view the source of a web page but when the right-click is disabled, these things would seem impossible. Bank websites and other sites that require a secure transaction such as a payment gateway are the ones to impose this kind of limited functionality on their pages. In this post, I will show you the ways by which you can easily bypass right-click block feature on any website.

In order to block the right-click activity, most websites make use of JavaScript which is one of the popular scripting languages used to enhance functionality, improve user experience and provide rich interactive features. In addition to this, it can also be used to strengthen the website’s security by adding some of the simple security features such as disabling right-click, protecting images, hiding or masking parts of a web page and so on.

How JavaScript Works?


Before you proceed to the next part which tells you how to disable the JavaScript functionality and bypass any of the restrictions imposed by it, it would be worthwhile for you to take up a minute to understand how JavaScript works.

JavaScript is a client side scripting language (in most cases), which means when loaded it runs from your own web browser. Most modern browsers including IE, Firefox, Chrome and others support JavaScript so that they can interpret the code and carry out actions that are defined in the script. In other words, it is your browser which is acting upon the instruction of JavaScript to carry out the defined actions such as blocking the right-click activity. So, disabling the JavaScript support on your browser can be a simple solution to bypass all the restrictions imposed by the website.
How to Disable the JavaScript?


Here is a step-by-step procedure to disable JavaScript on different browsers:


For Internet Explorer:

If you are using IE, just follow the steps below:
From the menu bar, go to Tools -> Internet Options.
In the “Internet Options” window, switch to Security tab and click on the button Custom level…


From the Security Settings, look for the option Active scripting and select the Disable radio button as shown above and click on “OK”.
You may even select the Prompt radio button, so that each time a page is loaded, you will have the option to either enable or disable the scripting.


For Google Chrome:


If you are using Chrome, you can disable the JavaScript by following the steps below:
Click on the Chrome “menu” button (on the top right corner) and select Tools.
From the “Settings” page, click on Show advanced settings…
Now under Privacy, click on the button Content settings…


Under the JavaScript, select the radio button which says “Do not allow any site to run JavaScript” and click on “Done”.


For Mozilla Firefox:


Steps to disable JavaScript on Firefox:
From the menu bar, click on Tools -> Options.
From the Options window, switch to Content tab, uncheck the option which says “Enable JavaScript” and click on “OK”.


How to Bypass the Right Click Block?


In order to bypass the right-click block or any other restriction imposed by JavaScript, all you need to do is just disable it in the browser and refresh the same page, so that it now reloads without JavaScript functionality. You are now free to right-click on the page, view its source or even copy any of the images that you may want to. Don’t forget to re-enable the JavaScript once again when your job is over. Otherwise lack of JavaScript support may result in unusual rendering of web pages.

How to Change DNS Servers


We recently looked at the many reasons you might want to use a third-party DNS server. You can change the DNS server for your entire network on your router or set it individually on a PC or other device.

Switching DNS servers back and forth can be tedious, so we have some tips for speeding it up — perfect if you use Tunlr to occasionally access geoblocked media sites.


On Your Router

If you want to change the DNS server for your entire network, you’ll need to do it on your router. All the devices on your network — PCs, smartphones, tablets, game consoles, and anything else connected to the network — get their DNS server from the router. By default, your router uses your Internet service provider’s DNS servers. Change the DNS server on your router and every other device on your network will use the DNS server you specify.


To do this, just access your router’s web interface — how you do this will depend on which router you have. If you’re not sure how to do this, you’ll probably want to glance at your router’s manual to see instructions and learn the default password you’ll need.


Once there, you’ll probably find a DNS option on one of the pages. Change this and the setting will affect your entire network. If you’re having trouble finding the option, search your router’s manual or perform a Google search for your model of router and “change DNS.”


Windows – Control Panel


You can also override the automatic DNS server selection and set a custom DNS server on each individual device. On Windows, you can change the DNS server for each network adapter separately — this means that you’ll have to change it for both your Wi-Fi and Ethernet connections if you use both wireless and wired network connections on a laptop.


You can do this from the Network and Sharing Center. View your list of network connections, right-click the one you want to configure, and select Properties. Select the Internet Protocol Version 4 (TCP/IPv4) option in the list, click the Properties button, and enter your desired DNS server addresses. For more details, read this full guide to changing your DNS server with screenshots.


Windows – Quick Switching


If you’d like to quickly switch between DNS servers, Windows makes this rather difficult. You could do it with the Command Prompt — we’ll cover that below — but average users would rather do it with a graphical application.

If you want to switch between DNS servers regularly — perhaps you use Tunlr as your DNS server occasionally so you can watch Netflix and Hulu outside the USA — we recommend DNS Jumper. It’s a free application that allows you to choose DNS servers from a list and quickly switch to them. You can enter custom DNS servers and even switch DNS servers for all your network adapaters at once. It’s much faster than digging through the Windows networking dialogs.


Windows – Command Line


If you want to avoid all the clicking and quickly change your DNS server, you can do this with a command in the Command Prompt window. The below command also be integrated into batch files you could use to quickly switch your DNS settings between multiple servers.

To do this, you’ll need an Administrator command prompt window — right-click the Command Prompt shortcut and select Run as Administrator to open it.

The following command sets the connection named “Local Area Connection” to use 8.8.8.8, one of the Google Public DNS servers, as its primary DNS server:

netsh interface ip set dns name=”Local Area Connection” static 8.8.8.8


On Your Smartphone or Tablet


Android and iOS devices allow you to set a custom DNS server, but this will only apply to a single network. In other words, you can change the DNS server for your home network, but you’ll have to change it again each time you connect to a new Wi-Fi network.


To do this on Android, open the Wi-Fi networks list and long-press the one you’re connected to. Tap Modify network and check the Show advanced options box. Set IP settings to Static and you’ll be able to change your DNS server — unfortunately, this also means you can’t use DHCP on the network anymore.


If your Android device is rooted, you can install the Set DNS app instead. With Set DNS, you can choose a custom DNS server and the app will automatically set your DNS server every time you connect to a new network — no need for static IPs or manually changing settings.

The process is similar on iOS. Go into the Wi-Fi Settings screen, tap the arrow next to the network you’re connected to, tap the DNS field, and enter your custom DNS servers.

After you change your DNS server for a Windows PC, you may need to flush your DNS cache in command prompt with the following command before your changes will take effect:

ipconfig /flushdns.


https://paypal.me/chetanservices?locale.x=en_GB